Loading
ReefControl Power / Deluxe Smart Power Center
Introduction
Congratulations on your purchase of Red Sea’s ReefControl Power, the smart power center for your reef aquarium.
ReefControl Power lets you switch any plugged-in device on or off – either manually from the ReefBeat App, automatically on a daily schedule, or in response to your aquarium’s sensors. Because it works with both Red Sea and non-Red Sea equipment, you can bring lighting, pumps, heaters, chillers, fans and more under one roof and manage them all from a single dashboard.
ReefControl Power constantly monitors the power consumption of each connected device, so you can see at a glance what every socket is drawing, review usage over time, and protect your equipment with automatic shutoff.
Connect ReefControl Power to a ReefControl Lite or Pro controller and any ReefSense probe or sensor can take charge of your sockets – switching a fan on if the water warms up, or cutting power if a leak is detected. You can also run heater, chiller or cooling-fan control on its own, without a controller, simply by connecting a ReefSense Temperature Probe directly to ReefControl Power.
ReefControl Power is a complete, standalone product: it connects to your Wi-Fi and is operated from the ReefBeat App on its own. For hands-on control, the optional Control Panel adds a backlit pushbutton for every socket – available separately, or supplied together with ReefControl Power as ReefControl Power Deluxe.
ReefControl Power is part of Red Sea’s suite of smart devices that are operated via Wi-Fi by Red Sea’s ReefBeat App, which needs to be installed on a smart mobile device with internet connectivity.
Welcome to Red Sea’s smart reef-keeping.
The Red Sea Team
Safety
PLEASE READ AND FOLLOW ALL SAFETY INSTRUCTIONS
THIS DEVICE IS INTENDED FOR HOUSEHOLD AND INDOOR USE ONLY.
DANGER: To avoid possible electric shock, special care should be taken when handling a wet aquarium. For each of the following situations, do not attempt repairs yourself; return the appliance to an authorized service facility for service or discard the appliance.
WARNING: To guard against injury, basic safety precautions should be observed, including the following:
Do not operate any appliance if it has a damaged cord or plug, if it is malfunctioning, or if it is dropped or damaged in any manner.
This appliance can be used by children aged from 8 years and above and persons with reduced physical, sensory, or mental capabilities or lack of experience and knowledge if they have been given supervision or instruction concerning use of the appliance in a safe way and understand the hazards involved. Children shall not play with the appliance. Cleaning and user maintenance shall not be made by children without supervision.
Close supervision is necessary when any appliance is used by or near children.
To avoid injury, do not contact moving parts.
Always unplug an appliance from an outlet when not in use, before putting on or taking off parts, and before cleaning. Never pull the cord itself to remove the plug from the outlet. Grasp the plug and pull to disconnect.
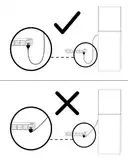
To avoid the plugged-in device’s cord pulling water toward the socket, arrange each cord so that it forms a “drip loop” – a low point in the cable below the level of the socket – so any water running down the cable drips off rather than reaching the socket or wall outlet.
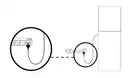
Do not use an appliance for anything other than its intended use. The use of attachments not recommended or sold by the appliance manufacturer may cause unsafe conditions.
Do not install or store the appliance where it will be exposed to the weather or to temperatures below freezing point.
Make sure an appliance is securely installed before operating it.
Do not exceed the maximum power rating shown on the data label on the product. Overloading may cause overheating.
Read and observe all the important notices on the appliance.

Note:
A cord rated for fewer amperes or watts than the appliance rating may overheat. Care should be taken to arrange the cord so that it cannot be tripped over or pulled accidentally. Do not use if the cord is damaged. In case of need, do not attempt to replace or repair it yourself; return the appliance to an authorized service facility for service or discard the appliance.
Components of the system
ReefControl
Power
ReefControl
Power DLX
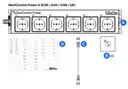
ReefControl Power 6:
A – ReefControl Power (EUR / AUS / CHN / UK) – R35817
B – 6 Rubber socket covers (one per socket) – R35835
C – 2 m (6.5′) data cable (connects ReefControl Power’s Data Port to either the Control Panel or a ReefControl Pro / Lite) – R35833
D – Socket labels (for marking which device each socket controls)
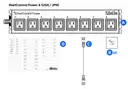
ReefControl Power 8:
A – ReefControl Power (USA / JPN) – R35830
B – 8 Rubber socket covers (one per socket) – R35836
C – 2 m (6.5′) data cable (connects ReefControl Power’s Data Port to either the Control Panel or a ReefControl Pro / Lite) – R35833
D – Socket labels (for marking which device each socket controls)
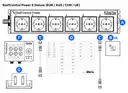
ReefControl Power 6 Deluxe:
A – ReefControl Power 6 (EUR / AUS / CHN / UK) – R35817
B – 6 Rubber socket covers (one per socket) – R35835
C – 2 m (6.5′) data cable (connects ReefControl Power’s Data Port to either the Control Panel or a ReefControl Pro / Lite) – R35833
D – Socket labels (for marking which device each socket controls)
E – 30 cm (12″) data cable (Control Panel to a ReefControl Pro / Lite) – R35834
F – Control Panel 6 – R35819
G – ReefControl Power 6 controller mounting bracket + screws / adhesive tape
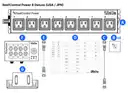
ReefControl Power 8 Deluxe:
A – ReefControl Power 8 (USA / JPN) – R35830
B – 8 Rubber socket covers (one per socket) – R35836
C – 2 m (6.5′) data cable (connects ReefControl Power’s Data Port to either the Control
D – Socket labels (for marking which device each socket controls)
E – 30 cm (12″) data cable (Control Panel to a ReefControl Pro / Lite) – R35834
F – Control Panel 8 – R35832
G – ReefControl Power 8 controller mounting bracket + screws / adhesive tape
Optional accessory:
• ReefSense Temperature Probe – R35825
• ReefControl Titanium Grounding Probe – R35828
• ReefSense USB-C connector (for using a ReefSense probe remotely) – R35838
Guide to the ReefControl Power
ReefControl Power is available in two versions to suit the power outlets in your region:
• ReefControl Power 6 – six Schuko / UK / Australia-style sockets, for use in most countries.
• ReefControl Power 8 – eight NEMA-style sockets, used primarily in North America and Japan.
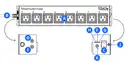
ReefControl Power
ReefControl Power contains the Wi-Fi module and is a complete product on its own – it onboards to the ReefBeat App, connects to your network, and shows its status without any other accessory.
• (A) Sockets – Each socket is individually controlled and can be given its own name in the app.
• (B) AC power cable – Plugs into a standard household wall outlet. The plug type matches your region.
• (C) Main Power Switch – Enables or disables power to all the sockets, the Wi-Fi and the Control Panel. Switching the Main Power Switch on restores the previous settings of the sockets.
• (D) Data Port – A single multi-purpose port. Connect any one of the following to it: a ReefSense Temperature Probe, the optional Control Panel, or a ReefControl Pro / Lite controller.
• (E) Grounding port – A dedicated port for the optional ReefControl Titanium Grounding Probe.
• (F) Settings LED – Shows Wi-Fi / network status.
• (G) Power LED – Shows the Main Power Switch state.
• (H) Status LED – Shows a device malfunction.
• (J) Resettable Circuit breaker – Automatic protection against overcurrent.
• (K) Settings button – Used for onboarding the device and for resetting it (see Connection and initial setup).
The Control Panel (optional – included in ReefControl Power Deluxe)
The Control Panel is a manual pushbutton unit that connects to ReefControl Power’s Data Port by a separate cable. It lets you operate the sockets manually, with or without a connection to the ReefBeat App, and is ideal for managing equipment during tank or sump maintenance. The backlit pushbuttons give a clear visual indication of the status of every socket.
The Control Panel carries a duplicate set of ReefControl Power’s status LEDs and settings button – so you can read status and operate the unit from whichever is more convenient. Anything you do on one is reflected on the other. Disconnecting the Control Panel from ReefControl Power does not affect the on/off state of the sockets.
The Control Panel also has its own Data Port, so a ReefSense Temperature Probe or a ReefControl Pro / Lite controller can be connected at the Control Panel instead of at ReefControl Power.
Control Panel pushbuttons – function
The Main ON/OFF pushbutton enables or disables the individual socket pushbuttons; its red backlight shows that they are enabled. Each individual socket pushbutton operates its socket manually. The pushbutton backlights show the status of each socket (see LED status meanings below), whether the socket is operated from the Control Panel or through the app. Disconnecting the Control Panel from ReefControl Power does not affect the on/off state of the sockets.
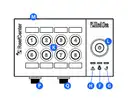
• (F) Settings LED – Shows Wi-Fi / network status.
• (G) Power LED – Shows the Main Power Switch state.
• (H) Status LED – Shows a device malfunction.
• (K) Socket pushbuttons – One backlit pushbutton per socket (six or eight to match your model). Each pushbutton operates its socket manually. The backlight colour and pattern show the socket’s status (see LED status meanings below), whether the socket is operated from the Control Panel or through the app.
• (L) Main ON/OFF pushbutton – Enables or disables the individual socket pushbuttons. The red backlight indicates that the pushbuttons are enabled.
• (M) Settings button – Duplicate of the settings button on ReefControl Power.
• (P) Data Port – Duplicate Data Port for connecting either a ReefSense Temperature Probe or a ReefControl Pro / Lite controller.
• (Q) ReefControl Power Port – For connecting the Control Panel with the ReefControl Power 6/8 unit.
Note:
You will receive labels to mark which device each socket controls. Apply them next to the matching pushbutton on the Control Panel, and/or beside the matching socket on ReefControl Power.
LED status meanings
These indicators appear on ReefControl Power, and – if you have the Control Panel – are duplicated on it.
(F) Settings LED (Wi-Fi / network):
• Solid red – the device is connected to your home network.
• Blinking red – the device is in Wi-Fi Access Point (AP) mode (it can be discovered by Wi-Fi devices).
• No red light – the device’s Wi-Fi is off.
• Double blink – indicates a change of status / end of a process.
(G) Power LED:
• Solid red – the Main Power Switch is on.
• No red light – the Main Power Switch is off.
(H) Status LED:
• Blinking red – device malfunction.
Socket pushbutton backlights:
• Solid (red or white) – the socket is currently ON.
• No light – the socket is OFF and will not come on without input from you.
• Blinking white – the socket is currently OFF but may turn on automatically, because it is controlled by a sensor or a programmed schedule.
• Pulsing white – a sensor-controlled socket is in its fallback state.
• Pulsing red – the socket is in a Quick Action mode (Feed, Maintenance or Emergency).
• Blinking red – a socket malfunction has been detected.
Main Power Switch
The Main Power Switch enables or disables power to all the sockets, the Wi-Fi and the Control Panel. Switching it on restores the previous settings of the sockets.
When you first power on ReefControl Power, the individual sockets are set to off. If a Control Panel is connected, the Main ON/OFF pushbutton is set to ON so you can use the individual socket pushbuttons to switch sockets on and off straight away – even before the unit has been onboarded to the ReefBeat App.
Settings button – function
• If the Settings LED is off (Wi-Fi is off): press the button for 5 seconds (until a double blink) to activate Wi-Fi AP mode.
• If the Settings LED is blinking (Wi-Fi is in AP mode): press the button for 5 seconds (until a double blink) to switch Wi-Fi off.
• If the Settings LED is on (Wi-Fi is connected to a network): press the button for 5 seconds (until a double blink) to disconnect from the network and switch back to Wi-Fi AP mode. All settings are retained, and the device continues working as programmed.
• Clear Settings: press the button for 15 seconds (until a double blink) to delete all user settings and switch off the Wi-Fi.
ReefControl Titanium Grounding Probe (optional)
The ReefControl Titanium Grounding Probe is an optional accessory that helps keep your aquarium safe from stray voltage – the small, usually harmless electrical charge that pumps, heaters and other equipment can induce in the water, and which can occasionally signal a failing piece of equipment. Connected to the dedicated grounding port on ReefControl Power, the probe gives that stray voltage a safe path away from the water, protecting both you and your livestock.
The probe has a corrosion-resistant titanium tip and a weighted body that keeps it submerged. To install it, place the tip in your sump or display tank and connect its lead to the grounding port on ReefControl Power.
Note:
The Grounding Probe is a safety accessory, not a sensor – it has no setup in the ReefBeat App.
How the system works
ReefControl Power puts each of your sockets under independent, programmable control. Plug a device into a socket, give it a name in the ReefBeat App, and choose how it should behave.
Four ways to control each socket
Every socket can be set to one of four control options:
• Always ON – the socket is live all the time.
• Always OFF – the socket is switched off all the time.
• Schedule – the socket turns on and off automatically according to a daily timer that you set (up to 10 on/off periods per day).
• Sensor control – the socket turns on and off in response to a reading from a probe or sensor, for example “switch OFF if the temperature rises above 28 °C / 82.4 °F.”
Each socket is controlled separately, so you can run a heater on Sensor control, your lights on a Schedule, and a return pump set to Always ON – all from the same unit.
Working with probes and sensors
There are two ways to give your sockets sensor control:
1. With a ReefControl Pro/Lite controller. Connect ReefControl Power to a ReefControl Lite or Pro using the cable supplied. Once the two are paired, any ReefSense probe or sensor connected to that controller can control individual sockets – using a temperature, pH, salinity or ORP reading, the ATO Sensor’s water level, or the Leak Detector. This lets you build automated safeguards such as switching on a cooling fan when the water warms, turning a heater off if it overheats, or cutting power if a leak is detected.
2. On its own, with a ReefSense Temperature Probe. Connect a ReefSense Temperature Probe to the Data Port (on ReefControl Power or on the Control Panel), and it can control your heater, chiller or cooling fan based on temperature alone – no controller required.
Note:
A single probe or sensor belongs to only one ReefControl Power unit. Place all the devices you want it to control on the same unit.
Note:
The Data Port takes one connection at a time. You therefore cannot connect both a ReefControl Pro/Lite controller and a ReefSense Temperature Probe to the same Data Port. If you connect a controller, set up the temperature probe through that controller instead. (If you have the Control Panel, its own Data Port gives you a second connection point.)
Power monitoring
ReefControl Power continuously measures the power drawn by each socket. You can view the current consumption of any device, see an interactive graph of the last 30 days, and receive a notification if a socket appears to be malfunctioning.
Fallback – what happens if a probe or sensor is lost
When you set a socket to Sensor control, you also choose a fallback state – Always ON or Always OFF – that the socket falls back to if the controlling probe or sensor is lost or disconnected. This keeps your equipment in a safe, known state even if communication is interrupted. The default fallback is OFF.
Online, Offline and Direct modes
• Online – connected to the ReefBeat cloud; all features are available, including Quick Actions and notifications away from home.
• Offline – connected to your router but not to the cloud; all everyday functions work except for cloud-based features such as Quick Actions.
• Direct – used when you have no home network. Basic functions are available: on/off, Schedule, and sensor control if a ReefSense Temperature Probe is connected.
Note:
Even if the app or your network is unavailable, ReefControl Power keeps running its programmed schedules. Timer-controlled sockets continue to operate normally while the Wi-Fi connection reconnects in the background.
Introduction to the ReefBeat App
All of Red Sea’s connected devices are operated via the ReefBeat App, which must be installed on a mobile device with an internet connection (including tablets). See the full list of supported mobile devices on our website.
Through your personal user account on the cloud, ReefBeat lets you set up and manage any number of aquariums and add multiple devices to each of them. It guides you through setting up your account, your aquarium(s) and your Red Sea connected devices, and is where you read parameters, set ranges, calibrate probes, configure equipment control, view logs, and manage notifications.
For full functionality, the device must have a permanent connection to the internet through your home Wi-Fi network. In this mode you will be able to see the current status of your ReefControl Power, change settings, and receive notifications on your mobile whenever you have access to the internet.
The ReefBeat homepage shows the current status of all your connected devices and links you directly to the settings page of each unit.
You can install ReefBeat on multiple mobile devices by entering the same user account details. All mobile devices will have the same rights for operating and changing the settings. Keep this in mind before giving your user details to any third party.
If you do not have a home network, or your home network does not have an active internet connection, you can connect and control your ReefControl Power in Offline or Direct Mode. However, certain functionality such as remote access, multiple mobile devices, status notifications and Quick Actions will not be available.
ReefBeat is constantly under development. For the most up-to-date operating instructions, view or download the latest user guide from the Red Sea website at www.redseafish.com.
App navigation in this manual is shown as a breadcrumb, for example: Homepage > Main Menu > My Aquariums > …
Note:
If this is your first Red Sea connected device, it is recommended that you complete the physical installation of your ReefControl Power before installing the ReefBeat App.
Installation
Mount ReefControl Power securely to the wall behind the aquarium, out of sight and out of reach, using the four mounting screws provided. It is designed to operate in a humid environment but it is not waterproof, so choose a dry, well-ventilated location where it cannot be splashed, and make sure there is easy access to the Main Power Switch.
When selecting the location, consider the following:
• The AC power cable plugs into a standard household wall outlet.
• The optional Control Panel connects to ReefControl Power’s Data Port by the 2 m (6.5′) data cable; if you have one, place it somewhere convenient and easy to reach, alongside your other controllers. It is designed for a humid environment but is not waterproof, so choose its location accordingly.
• If you are using a ReefSense Temperature Probe, its cable needs to reach a Data Port (on ReefControl Power, or on the Control Panel if you have one).
• If you are connecting to a ReefControl Lite or Pro, a data cable needs to reach between a Data Port and the controller.
Data cables supplied
• ReefControl Power includes a 2 m (6.5′) data cable that connects ReefControl Power’s Data Port to either the Control Panel or a ReefControl Pro / Lite controller.
• A Control Panel bought on its own (aftermarket) includes a 30 cm (12″) data cable that connects the Control Panel to a ReefControl Pro / Lite.
• ReefControl Power Deluxe includes both cables – typically the 2 m (6.5′) cable runs from ReefControl Power to the Control Panel, and the 30 cm (12″) cable runs the Control Panel to a ReefControl Pro / Lite.
Steps
1. Mount ReefControl Power on the wall with the four screws provided. Make sure it sits above any possible water level, that there is easy access to the Main Power Switch, and that no cables run uphill into it.
2. If you have the Control Panel, connect it to ReefControl Power’s Data Port with the 2 m (6.5′) data cable, and mount it where you can reach it easily.
3. Connect the rest of your setup to a Data Port (each Data Port takes one connection at a time):
• (A) Control Panel only: use the 2 m (6.5′) cable from ReefControl Power’s Data Port to the Control Panel (step 2).
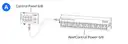
• (B) ReefControl Pro / Lite only (no Control Panel): use the 2 m (6.5′) cable from ReefControl Power’s Data Port to the controller. You will complete the pairing in the app – see Operating your ReefControl Power.
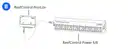
• (C) Both Control Panel and ReefControl Pro / Lite: with the 2 m (6.5′) cable already running from ReefControl Power to the Control Panel, use the 30 cm (12″) cable from the Control Panel’s Data Port to the controller.
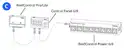
• (D) ReefSense Temperature Probe (standalone, no controller): connect the probe to a free Data Port – on ReefControl Power, or on the Control Panel if you have one.
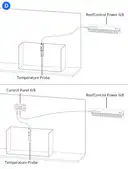
4. Arrange the cable of every plugged-in device into a drip loop (see Safety) so that water cannot run down a cable into a socket.
5. Plug each piece of equipment into a socket and note which device is in which socket. Apply the supplied labels.
6. Leave the supplied rubber cover fitted over any socket you are not using (see note below).
7. Plug the AC power cable into the wall outlet and switch the unit on using the Main Power Switch.
Note:
Do not exceed the maximum power rating shown on the data label on the product. See note below about chillers.
Note about Chillers:
Chillers cycle on/off during the day, as required to maintain the water temperature close to the desired set point. Every time a chiller starts cooling it has a short power spike that can be approximately 5 times its rated wattage. When checking that you are not exceeding the total power rating, multiply the rated power of the chiller by 5. As a general guideline: for 230VAC, less than 1/3HP; for 110VAC, less than 1/4HP. For 230VAC, use socket 1 for chillers.

Note:
ReefControl Power is supplied with a bespoke rubber cover for every socket. It is highly recommended to leave the cover on any socket that is not in use, to make the unit more splash-resistant.
Connection and initial setup
1. Download and install the ReefBeat App from the App Store or Google Play, as appropriate for your mobile device. (In countries without access to Google Play, an APK file and installation instructions can be downloaded from Red Sea’s website.)
2. After installing ReefBeat, you will be guided through setting up your ReefBeat user account and aquarium(s). Account details can be edited only while your mobile is connected to the internet. You can then start adding your Red Sea connected devices.
Note:
Make sure you select the correct world time zone for where your aquarium is located. The default is the same time zone as your mobile, which might be set for a different location. There is also a “Daylight Saving Time” (DST) toggle that needs to be switched manually at the beginning and end of DST for your location. Correct time settings are important for scheduling and logs.
3. For full functionality, set your aquarium to “Online.” If you do not have an available Wi-Fi network at your aquarium, set it to “Offline.” You can change this later when Wi-Fi becomes available.
4. If you have set up more than one aquarium, select the aquarium from the dropdown menu at the top of the screen before proceeding.
5. Set the ReefControl Power to AP (Access Point) mode by pressing its Settings button for 5 seconds (until it double-blinks); the Settings LED will blink. If you have the Deluxe version, the duplicate Settings button on the Control Panel does the same thing.
6. Go to Homepage > Main Menu > Device Manager and tap Add Device, select the icon for the ReefControl Power, and follow the instructions in the app. This may take a few seconds. If no devices appear on the list, check that the unit is in AP mode and/or refresh the page.
Note:
The ReefControl Power access-point (AP) name will appear as RSPOWER6-XXXXXXX or RSPOWER8-XXXXXXX, depending on your model.
7. ReefBeat will display a list of Wi-Fi networks available to the unit. Select your preferred network and wait while the device connects to it; the Settings LED then turns solid.
8. If you have set the aquarium to Offline, select the “Direct Mode” option at the top of the screen to skip the network connection; the Settings LED keeps blinking as the unit stays in AP mode.
9. Give the device a name (up to 30 characters) and follow the remaining on-screen instructions. Once the device is connected, you will be directed to the settings page, ready to set up your sockets.
Note:
When re-onboarding a unit that was deleted, you are given the option of restoring all of the previous settings. This does not apply if you did a “Hard Reset” as this restores the default factory settings.
Operating your ReefControl Power
After adding the device, you’ll see a settings page with one tab for each socket (six or eight), plus a Temperature tab and an Analytics tab. A socket you haven’t set up yet shows a “Set up” prompt; complete its setup to use its controls.
ReefSense Probes & Sensors
ReefControl Power’s sockets can be switched automatically by ReefSense Probes & Sensors, each of which has its own manual:
• ReefSense Temperature Probe – connects directly to ReefControl Power’s Data Port, so sockets can respond to temperature even without a controller. See the ReefSense Temperature Probe manual.
To use any other ReefSense Probe or Sensor, pair ReefControl Power with a ReefControl Pro/Lite controller; the readings from the probes and sensors connected to that controller can then switch ReefControl Power’s sockets (see Setting up a socket). Each has its own manual:
• ReefSense pH & Temperature Probe – pH and temperature. See the ReefSense pH & Temperature Probe manual.
• ReefSense Salinity & Temperature Probe – salinity and temperature. See the ReefSense Salinity & Temperature Probe manual.
• ReefSense ORP Probe – ORP (REDOX). See the ReefSense ORP Probe manual.
• ReefSense ATO Sensor – water level for automatic top-off. See the ReefSense ATO Sensor manual.
• ReefSense Leak Detector – detects spilled water. See the ReefSense Leak Detector manual.
Setting up a socket
1. Tap a socket tab to begin, and follow the steps in the app.
2. Step 1 – Name the socket. Choose which socket you are setting up and give it a name (letters and numbers, up to 14 characters), for example “Heater” or “Return pump.” Tapping Skip returns you to the settings page without configuring a socket.
3. Step 2 – Choose a control option. Select Always ON, Always OFF, Schedule, or Sensor control.
• For Always ON or Always OFF, setup is complete after this step.
• For Schedule or Sensor control, the app then asks you to set up the schedule or the sensor control.
4. When you finish, the socket’s settings tab opens with your chosen control applied.
Setting up a Schedule
When you choose Schedule, the “Set up Schedule” step lets you define the periods when the socket is ON:
1. The default time slot is 00:00-23:59. Tap it to edit, or tap the + icon to add a new slot.
2. For each slot, set Start Time and End Time. The day runs from midnight to midnight.
3. You can set up to 10 time slots per day. There must be at least one slot in the schedule.
4. Tap Add to save a new slot, or Edit then Save to change an existing one. Delete removes a slot (disabled if only one slot remains).
Note:
Each slot’s start time must be before its end time, and the app will let you know if a schedule doesn’t add up.
Setting up Sensor control
When you choose Sensor control, the “Set up sensor control” step lets you choose which sensor controls the socket and define the condition:
1. Choose which parameter will control the socket from the list of available probes and sensors.
• If a ReefSense Temperature Probe is connected to ReefControl Power’s Data Port, its temperature reading is the only option offered.
• If ReefControl Power is paired with a ReefControl Pro/Lite controller, the list shows every parameter available from the probes and sensors connected to that controller. Each parameter is listed separately – for example, a ReefSense pH & Temperature Probe appears as two entries, its pH sensor and its temperature sensor – so you can pick exactly the one you want: a temperature, pH, salinity or ORP reading, the ATO Sensor’s water level, or the Leak Detector.
2. Set the condition in plain language, for example “Turn the socket OFF if the temperature rises above 28.” To stop the socket switching on and off repeatedly around that value, the app applies a small switching margin (called hysteresis): once a socket has switched, the reading has to move back past the set point by that margin before it switches again. You can adjust the margin.
• With a ReefSense Temperature Probe connected directly to ReefControl Power, one margin applies to all sockets controlled by the probe.
• When ReefControl Power is connected to a ReefControl Pro / Lite, each socket can have its own margin, set individually per socket and sensor.
3. Set the fallback. Choose whether the socket should be ON or OFF if the controlling probe or sensor is ever lost or disconnected (default: OFF).
4. When you finish, your settings are applied to the socket.
Connecting a ReefSense Temperature Probe directly to ReefControl Power
Connect the ReefSense Temperature Probe to the Data Port (see Installation), then set it up and manage it from the Temperature tab in the app. Until it is set up, the tab shows a “Set up temperature probe” prompt – tap it to begin.
Setting the probe’s temperature ranges (you set the Desired and Acceptable ranges; anything beyond the Acceptable range is the Danger range), viewing its graph and 30-day log, applying a Temp Adjustment offset, and taking an instant reading with the probe used remotely are all covered in the ReefSense Temperature Probe manual. You can choose to be notified when the temperature enters its Danger range; ReefControl Power signals the Danger range by notification only, as it has no audible alarm.
Once the probe is set up, you can set any socket to be controlled by its temperature – for example switching a heater off and a chiller on if the water gets too warm – without needing a paired controller (See Setting up a socket).
Each socket’s settings tab
Once a socket is set up, its tab gives you:
• Socket name and Control selection – change the name or switch between Always ON / OFF / Schedule / Sensor control at any time.
• Current power consumption – the live draw of the connected device.
• Power log and consumption graph – usage over the last 30 days.
• Show on homepage – include this socket on the homepage card.
• Edit name / Delete – rename or remove the socket setup.
The Analytics tab
The Analytics tab shows combined graphs across all your sockets, plus a Sockets Log.
Operating sockets manually (Control Panel)
If you have the optional Control Panel, you can operate sockets without the app:
• Short press a socket pushbutton – toggles that socket:
• Always ON → Always OFF
• Always OFF → Always ON
• Schedule or Sensor → Always OFF
• Long press a socket pushbutton – restores the previous Schedule or Sensor setting after a manual switch-off. (A long press has no effect on a socket set to Always ON, or on a socket that was never set up in the app.)
• Main ON/OFF pushbutton – one press switches all sockets off (Main OFF mode); press again to restore them all to their previous settings. While in Main OFF mode, the individual socket pushbuttons have no effect and the Main ON/OFF pushbutton pulses red.
Note:
Any change you make on the Control Panel is reflected in the app, and vice-versa. The app’s Device Manager “Main OFF” and the physical Main ON/OFF pushbutton mirror each other.
Power monitoring and overload protection
ReefControl Power shows the real-time power consumption of every connected device and protects your equipment automatically.
Overload protection
If a socket – or the unit as a whole – draws more power than it should, ReefControl Power switches the affected socket off to protect your equipment. The Status LED blinks, and if a Control Panel is connected, that socket’s pushbutton backlight blinks as well.
To restore the socket, first deal with whatever caused the overload (for example, unplug or replace the faulty device or remove some of the load), then tap Resume at the top of the socket’s settings page in the app. If you have a Control Panel, you can also press that socket’s pushbutton to resume.
Note:
Always resolve the cause of an overload before resuming. Resuming without fixing the underlying problem will simply trigger the overload again.
Socket malfunction
If ReefControl Power detects that a socket is not behaving as expected, the Status LED blinks, and – if a Control Panel is connected – that socket’s pushbutton backlight blinks as well. (See LED status meanings in the Guide.)
Quick Actions (online users)
ReefControl Power can be added to ReefBeat Quick Actions, which apply a preset across your connected devices. Quick Actions are available for online users only and are managed via the cloud. Edit them from the homepage 3-dot menu (Homepage > … > Edit Quick Actions). Quick Actions cannot be edited while they are running.
• Feed Mode – switches assigned sockets on or off for a set period (for example, pausing pumps while you feed). Set a duration (default 30 minutes; range 5-200 minutes) and an optional start delay for each socket. Feed Mode can be started from the app or a ReefDose food head, and cancelled at any time. At the end of the period, each socket returns to Auto. Sockets not assigned to Feed Mode keep running normally.
• Maintenance and Emergency – switch assigned sockets on or off while the action is enabled, and return each one to Auto when it is disabled. Sockets not assigned keep running normally.
• Quick Actions return delay – an optional delay before sockets return to Auto, so other equipment and water levels can settle first. (For Feed Mode, the delay applies only when you cancel manually, not when the timer ends.)
Note:
While a Quick Action is running, the Control Panel pushbuttons for the included sockets are disabled. Sockets not included in the action continue to work from both the app and the Control Panel.
Device Manager
Reachable from the ReefBeat homepage; lists all Red Sea connected devices on each aquarium, by type and in the order added. Tapping a device opens its actions; the 3-dot menu for a device type acts on all devices of that type at once.
• Turn OFF / Turn ON – temporarily disable or enable a device without unplugging it or losing its settings (Device Manager > device line menu, or the device-type menu for all at once). For ReefControl Power this is equivalent to the physical Main ON/OFF pushbutton; when off, the physical socket pushbuttons still work, and a “Main OFF” set in the app can be cancelled by pressing the Main ON/OFF pushbutton on the Control Panel.
• Rename – change the device’s name.
• Delete a device – remove it from the aquarium (Device Manager > device line menu > Delete). Deleting a device before switching it off prevents unnecessary “disconnected” notifications.
• Firmware update – from time to time you may be notified that a new firmware version is available; keeping the device updated ensures compatibility with the ReefBeat App. Update one device via Device Manager > device line menu > Firmware Update, or all devices of a type via the device-type menu. Do not unplug the device while it is downloading and installing. Your previous settings are kept. If an update is not successful, the device automatically reverts to the previous version – repeat the process a few minutes later. A separate Control Panel firmware update is available when a Control Panel is connected; if it cannot update, the app will prompt you to check that the Control Panel is connected, then try again.
Note:
Firmware updates for the Control Panel and the ReefSense Temperature Probe are performed via Bluetooth, so Bluetooth must be enabled in your phone’s settings. For the Temperature Probe, it must be connected to your ReefControl Power and not in Remote mode; when you run an update, keep your phone within approximately 3 m (10′) of the probe and leave the app open.
• Reboot – restart the device; your settings are not affected.
• Hard reset (factory reset) – permanently remove all your settings and return the device to its default state. If connected: Device Manager > Hard-Reset. If not connected: hold the Settings button about 15 seconds (until the Wi-Fi LED double-blinks), release, and wait about a minute for the reboot.
• About – shows the device’s details and its current firmware version.
Note:
When a unit is turned off or reset, any sockets under Sensor control switch to their fallback setting.
Troubleshooting
Press here for the Troubleshooting guide for the full ReefControl Family
Spare parts
Specifications
Specification
Value
Operating temperature
5 to 45 °C
Relative humidity
15-85 % RH
Supply voltage
100-240 V, 50/60 Hz
Operating frequency
2402-2480 MHz
Max. RF power
32.43 mW
Dimensions
8.5 × 41 × 7.7 cm (approx. 3.4″ × 16.2″ × 3″)
The centimetre dimensions are the accurate figures; the inch figures are close approximations.
Sockets
• ReefControl Power 8 (USA / Japan): 8 × NEMA 5-15 sockets.
• ReefControl Power 6 (EU / UK / Australia / China): 6 × Schuko / UK / Australia / China-style sockets.
Power rating
The maximum power rating varies from country to country, in line with each country’s household electrical code, so it is not printed in this manual. Always check the data label on the product for the rating that applies to your unit, and do not exceed it.
Warranty
Red Sea Products Limited Warranty.
The limited warranty sets forth all of Red Sea Aquatics Ltd (Red Sea) responsibilities regarding this product. There are no other express or implied warranties from Red Sea.
Red Sea warrants your product against defects in materials and workmanship for a period of 24 months, valid from the date of original purchase, and will repair this product free of charge (not including shipping costs) with new/rebuilt parts. The precondition for the warranty is that the stipulated set-up routine is observed. In the event that a problem develops with this product during or after the warranty period, contact your local dealer or Red Sea (at the company address indicated) for details of your nearest authorized service center.
The warranty is extended only to the original purchaser. Proof of date of purchase will be required before warranty performance is rendered. This warranty only covers failures due to defects in materials or workmanship which occur during normal use. It does not cover damage which occurs during shipment or failures which result from misuse, abuse, neglect, improper installation, operation, mishandling, misapplication, alteration, modification or service by anyone other than an authorized Red Sea service center. Red Sea shall not be liable for incidental or consequential damages resulting from the use of this product, or arising out of any breach of this warranty. All express and implied warranties, including the warranties of saleability and fitness for particular purpose, are limited to the applicable warranty period set forth above.
These statements do not affect the statutory rights of the consumer.
USA
Some states do not allow the exclusion or limitation of incidental or consequential damages, or limitations on how long an implied warranty lasts, so the above exclusion or limitations may not apply.
Regulatory
FCC Compliance Statement:
This device complies with part 15 of the FCC rules. Operation is subject to the following two conditions: (1) This device may not cause harmful interference, and (2) this device must accept any interference received including interference that may cause undesired operation. Any changes or modifications not expressly approved by Red Sea could void the user’s authority to operate the RF Module and/or the product that incorporates the RF Module. The user is cautioned to maintain a 20 cm (8 inch) spacing from the product to ensure compliance with FCC regulations.
CE Declaration of Conformity:
The equipment complies with the RF Exposure Requirement 2014/53/EU, Council Recommendation on the limitation of exposure of the general public to electromagnetic fields (0-300 GHz). This equipment meets the following conformance standards: EN 300 328, EN 301 489-17.
European Union – Disposal Information:
This symbol means that, according to local laws and regulations, your product should be disposed of separately from household waste. When this product reaches its end of life, take it to a collection point designated by local authorities. Some collection points accept products for free. The separate collection and recycling of your product at the time of disposal will help conserve natural resources and ensure that it is recycled in a manner that protects human health and the environment.

DISPOSAL:
Do not dispose of this product as unsorted municipal waste. Collection of such waste separately for special treatment is necessary. This product must not be disposed of together with the domestic waste. This product has to be disposed of at an authorized place for recycling of electrical and electronic appliances. By collecting and recycling waste, you help save natural resources, and make sure the product is disposed of in an environmental friendly and healthy way.